
Getting full estimate data into Zapier
Pull every question, answer and price, plus any custom fields like an opt-in consent tick box, from a Priceguide estimate into your Zap — then email it, push it to your CRM, or branch on it.
The standard Priceguide Zapier trigger gives you a lead's contact details, any custom fields you added to your form, and a link to their results page. It does not give you what they actually answered — which services they chose, how big their property is, what extras they added, or the price they were shown. It also leaves out any custom fields you've added to the form, such as an SMS consent tick box.
This guide adds one code step to your Zap that pulls all of that in.
Custom fields included: any fields you've added to your contact form, including opt-in consent tick boxes, come through automatically. A consent box arrives as a simple Yes or No you can filter on, so you only text or call people who opted in. See the details.
What you get
Every estimate arrives in Zapier decoded, like this:
Those are real values read from the customer's own estimate — the questions they were asked, the answers they gave, and the prices attached to each choice.
Before you start
- A paid Zapier plan. Multi-step Zaps and the Code step aren't on the free tier.
- Your Priceguide login, to connect the account in step 1.
- At least one estimate already submitted on your estimator. If you have none, submit a test one yourself first — Zapier needs a real record to build against. Use a name and email you'll recognise.
You don't need to write any JavaScript. You'll paste the script as-is.
Step 1 — Trigger: New Estimate (Instant)
- Create a new Zap.
- For the trigger app, search priceguide and pick the latest version.
- Trigger event: New Estimate (Instant).
- Connect your Priceguide account. If you manage several brands, check you're connecting the right one — this is the most common mistake.
- Test the trigger and pick a record. Choose the test estimate you submitted, so you can sanity-check the numbers later.
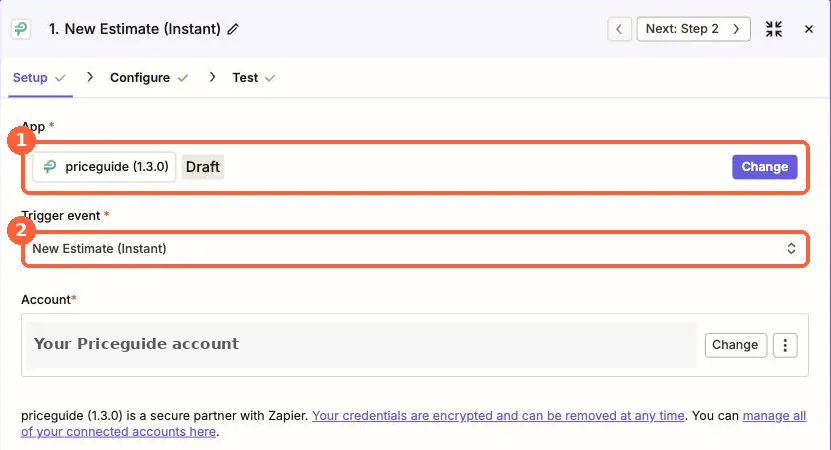
You should see fields including ID, URL, Name, Email, Phone and ZIP Code. The URL is the customer's results page — that's what the next step reads.

Step 2 — Add the decoder
- Add an action step and search for Code by Zapier.
- Choose Run Javascript.
- In the Input Data panel on the left, add these six rows. The left box is the name (type it exactly — it's case-sensitive), the right box is mapped from the trigger.
| Input name | Map to trigger field |
|---|---|
resultsUrl | URL |
estimateId | ID |
name | Name |
email | |
phone | Phone |
zip | ZIP Code |
Tip: in the value box, type / to open the field picker.
Then delete the sample code in the Code panel, paste in the script, and hit Run Code.
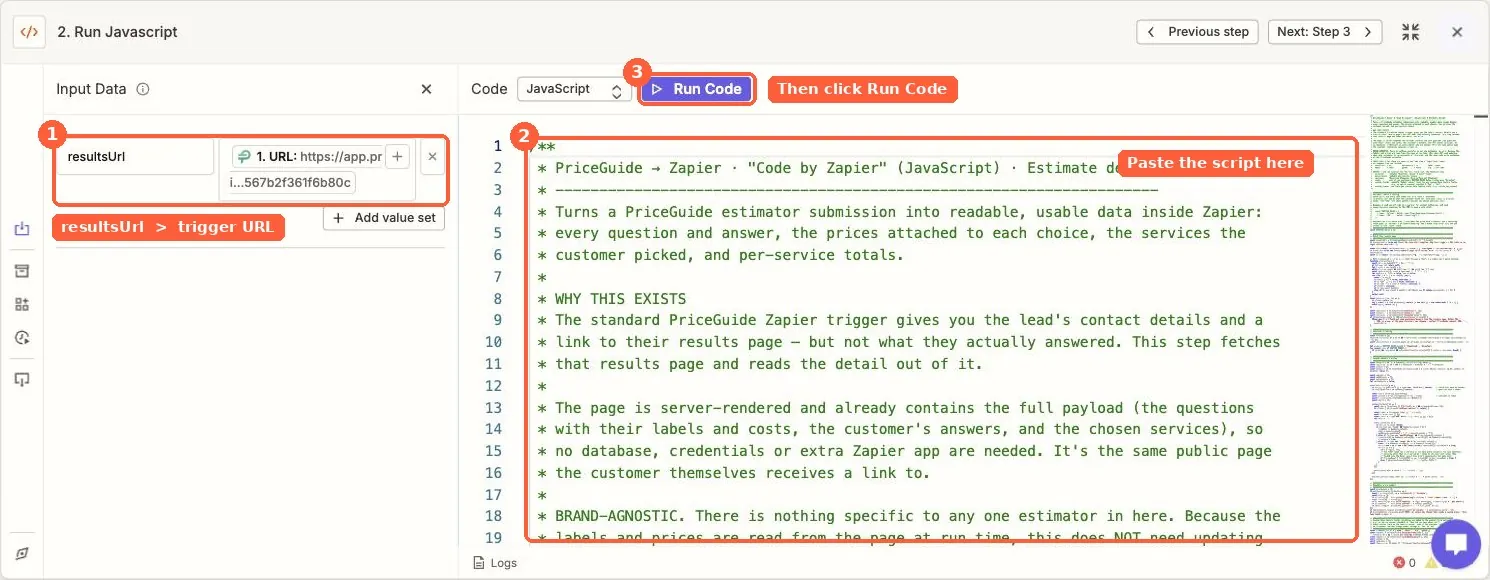
resultsUrl to the trigger's URL (1), paste the script into the Code panel (2), then click Run Code (3).You should see the decoded fields appear — qa_block, price_block, services and the rest. Check the prices against what your estimator actually shows for those answers.
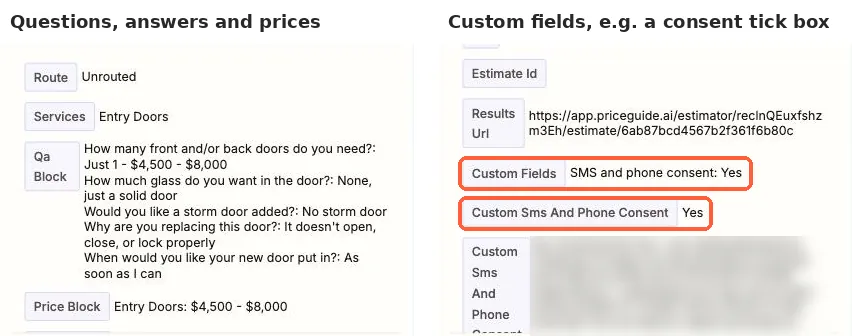
That's the whole thing working. Everything below is optional.
What comes out
| Field | What it is |
|---|---|
qa_block | Every question and answer as readable lines, with the price for each choice |
price_block | Per-service totals — base price, ongoing monthly where relevant, add-ons, surcharges |
services | Services chosen, comma-separated |
add_ons | Fixed-price extras chosen, e.g. Inside the fridge ($50) |
surcharges | Extra charges such as a pet surcharge, kept separate from the base price |
custom_quote | true when the customer picked an option needing a manual price — these leads need a call |
route | Which branch this lead belongs to — see routing below |
namefirst_namelast_name | The lead's name, whole and split (many CRMs want them separate) |
email, phone, zip | Contact details, passed straight through |
results_urlestimate_id | The results page link and its ID |
custom_fields | Every custom field on your contact form (for example an opt-in consent tick box) as readable "Label: value" lines |
custom_<name>custom_<name>_wording | One field per custom field, named after it, e.g. custom_sms_consent. Tick boxes come through as Yes or No (No if left unticked), and _wording holds the exact tick-box text the customer agreed to |
Custom fields and opt-in consent
If you've added your own fields to the contact form, such as an opt-in consent tick box, they come through automatically. There's nothing to configure.
Custom fields now also come straight out of the New Estimate (Instant) trigger, so if they are the only extra you need, map them from the trigger and skip the code step altogether. The code step is what gives you the questions, answers and prices.
From the code step, map custom_... into your CRM's consent or notes field. If you add a new field later, re-run the code step (Run Code or Test step) so Zapier picks up the new custom_ fields.
A note on prices
Prices come out as ranges, because that's what a Priceguide estimator shows a customer. Treat them as an estimate that opens a conversation, not a fixed quote.
Two deliberate choices in how they're totalled:
- The first priced answer for a service is treated as the base price (usually the size question). Anything priced after that — a pet surcharge, for instance — is listed separately under
surchargesrather than folded into the base. This stops per-visit and per-month figures being silently mixed together. - Fixed-price extras are summed into
add_ons.
If your estimator prices things unusually, check price_block against a few real estimates before putting the figures in front of a customer.
Optional: branch on what the customer asked for
If different services should go to different places, you can branch the Zap.
1. Set your rules. Near the top of the script you'll find:
Replace it with your rules, in priority order. First match wins:
The match is a pattern tested against the chosen services. /one-?time|deep/i matches "One-Time/Deep Cleaning" whether or not it's hyphenated, upper or lower case.
2. Add a Paths step after the code step, and set each path's condition to route → (Text) Exactly matches → your rule name.
3. Put your actions inside each path.
Worked example
A cleaning franchise wanted one-off and move-out cleans handled instantly by an AI booking assistant, while recurring enquiries went to their CRM to book an in-home visit. The rules above do exactly that.
Note what happens when someone asks for both a one-off and a recurring clean: because first match wins, they go to Partner only. One fast response instead of two competing ones. That ordering is the whole reason the rules are a list rather than a set of independent tests — put the branch that should win at the top.
Optional: send it somewhere
Whatever you add after the code step, the decoded fields are available to it:
- Email to a person or a parsing inbox. For anything beyond light volume use a proper sending app (SendGrid, Gmail, your own SMTP) rather than Email by Zapier, which is rate-limited and sends from a generic address. If a partner system is parsing the email, ask them which sender address to use so they can whitelist it.
- Webhook to a CRM. Map
qa_blockinto a notes or description field, and the contact fields into their own. - Slack or Teams.
qa_blockandprice_blockare already formatted to read well as-is.
A shortcut worth knowing: rather than clicking through the field picker for every merge field, you can type a whole email body in one go using {{stepid__fieldname}} tokens — for example {{123456789__qa_block}}. Get the step ID from the URL while that step is open in the editor. Zapier turns them into proper field pills as you type.
Troubleshooting
| What you see | What it means |
|---|---|
| No resultsUrl supplied | The resultsUrl input is missing or misspelled. It's case-sensitive, and must map to the trigger's URL field. |
| Results page fetch failed: HTTP 404 | The URL is wrong. Check you mapped URL and not something else. |
| Could not read questions/answers | The page loaded but held no estimate — usually a stale or invalid estimate ID. If it happens on a genuine, recent estimate, contact support: the page structure may have changed. |
| Output appears but prices look wrong | Check the estimator itself first — the script reads whatever prices are configured there. If the estimator is right and the output isn't, send us the results URL. |
| (unknown option) in qa_block | The estimate was submitted against an older version of the estimator and an answer no longer exists. Harmless on old records; get in touch if it happens on new ones. |
How it works, and what to watch
The script fetches the customer's results page and reads the estimate data embedded in it. That page is server-rendered, so the questions, answers, chosen services and prices are all present in the HTML — no login required. It's the same page the customer gets a link to.
- It's read-only. Nothing is written back, and no credentials are involved.
- It doesn't need maintaining when you re-price. Labels and costs are read at run time, so re-pricing or re-versioning your estimator needs no change here.
- It's brand-agnostic. Nothing in the script refers to a specific estimator — the same code works on any Priceguide estimator.
- It adds two to three seconds per lead, which is the page fetch.
One caveat, stated plainly. This reads a rendered page rather than a documented, versioned API. That's what makes it possible without credentials, but it also means a future change to the app could break it. The script fails loudly with a clear message rather than silently passing on empty data, so you'd see it in your Zap history rather than discovering it in a customer conversation. If you're building something business-critical on this, talk to us about a supported endpoint first.
The script
Paste this into the Code by Zapier step. The only line you may want to change is ROUTING_RULES near the top.
Questions, or something not behaving? Email [email protected] with your Zap ID and the results URL you're testing against.